Makeover ideas for your concrete garden ornaments
December 4th, 2010
On Friday, I enjoyed a rare luxury – a return to a favorite garden I’ve written about twice in the past decade:
I hopped in the car and drove to Snohomish, Wash., where I lunched with two long-time friends from my days working for The Herald, the daily newspaper in Everett, Wash. (it’s a mid-sized city located about 30 miles north of Seattle).
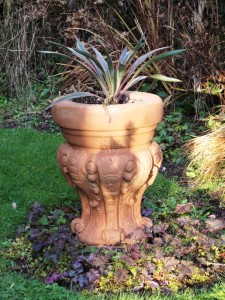
Here is a beautiful planter; once dreary gray concrete, it has been warmed up with a coating of terra cotta-colored Latex paint.
In the process, I learned something new about how to save drab, lifeless cast-stone (concrete) containers and garden ornamentation.
Read on for the simple steps:
Marco Henry, a gifted artist, garden and interior designer and Venetian expert, hosted a little luncheon at his amazing home. We were joined by our mutual friend Darlene Huntington, one of my very first “sources” when I joined The Herald’s Home & Garden section in 2000.
Over the years, I have had the privilege of writing about both of these incredibly talented gardeners and their verdant, plant-filled environments. The two introduced me to other Snohomish County plant fanatics, owners of vintage homes, collectors of antiques and garden-makers. I have been so enriched as a writer and gardener from that 4-1/2-year episode of my life.
After lunch we, of course, ventured out to Marco’s garden. Yes, it’s winter here in the Pacific Northwest, but when you have structural plants (such as Italian cypresses and ball-shaped boxwood shrubs), there’s lots to appreciate. When you see these elements, you understand what people mean when they say to design the “bones” of the garden for year-round interest.
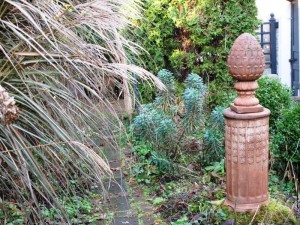
A simple coat of Terra Cotta pigment, from a can of Latex paint, transformed an old concrete pedestal and finial into a work of art.
I first wrote about Marco and his garden when it was included on the Northwest Perennial Alliance’s “Open Garden” tour in 2000. Darlene marched me over to Mark’s home for an introduction. When I entered the Gothic-inspired wood gate, mounted into a niche in the beautifully-groomed hedgerow, I gasped and gazed in awe at what I saw inside: plant collections, art collections, vintage furniture, water features, sculpture and more – all surrounding a circa 1912 farmhouse and yard, complete with chicken coop and green house.
This garden has the power to transport its viewer to a horticultural world we all yearn to possess. Is it a formal Italian garden? Or a cottage-style English estate? Maybe it’s a a landscape in the South of France. Each of these influences has a voice in Marco’s garden.
A teacher early in his career, Marco can be credited with giving a generation of fortunate kindergardeners an appreciation for art, color and beauty. Now, the grown-ups in his world can learn from his garden design techniques and his unique aesthetic.
My June 2000 article was called “Secret Garden.” I just unearthed that article and re-read it, savoring some of Marco’s choice quotes:
“I’m a plant collector, a collector period. Some people put all of their collection together in one place. I don’t. I like to make something artistic out of it.
“If I buy one of something I like, it’s the beginning of a collection. I could be Chinese porcelain or it could be coleus.”
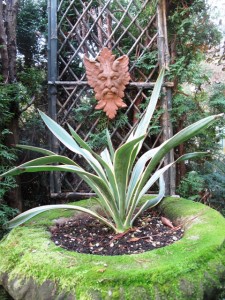
My eyes were drawn to the Green Man plaque, all the more noticeable now that he's been coated in Terra Cotta paint
In 2006, I was asked by Cottage Living magazine to again write about Marco’s garden. We had fun with that story, which was photographed by Richard Warren. I loved sharing Marco’s gardening style with a national readership, especially his tips on growing and designing with hydrangeas.
Marco is passionate about Venice, a city he first visited in 1968 as a young man. In a post-card written to his parents that year, he said he could imagine living in Venice. Now that dream is practically true, since Marco travels to Venice at least twice annually. He has guided many tours there for fans of Venetian architecture, art and gardens, and he lectures on the lessons we can learn from the gardens of Venice.
Today’s lesson was all about Terra Cotta and the way it can warm up a garden, especially ones here in the Pacific Northwest that exist under a grayish cloud cover all winter long. Marco showed me several ornamental pieces that began their lives as uninteresting blobs of concrete. Concrete, he says, often recedes and is visually obscured by the greenery around it. Now he’s infused these pieces with the sun-drenched character of Italy. It’s a simple process and one I’m eager to try myself:
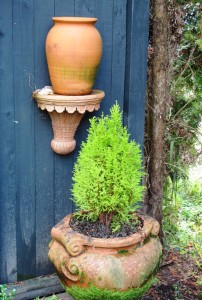
The little Terra Cotta "shelf" was transformed from gray cast-stone concrete to rich Terra Cotta - with Latex paint!
1. Find a piece of broken Terra Cotta pottery or a flowerpot with the perfect red-pink shade you love.
2. Take it to the paint store and ask the guys to mix up a can of paint that matches your sample. Be sure to order exterior Latex (water base) paint.
3. Fill a plastic bucket with some of the paint and drizzle in a bit of water to dilute it to a consistency that’s easy to work with. It can be more like a glaze or a stain in thickness.
4. Start painting any old piece of ordinary garden concrete. You may wish to coat the concrete with one, two, or three coats. The water-base pigment will “take” to the concrete differently, depending on how porous it is. Marco says the Terra Cotta-colored paint definitely “soaks” into the pores of the concrete.
5. Finally, you will enjoy what looks like perfectly-cast Terra Cotta. It weathers nicely and may soon take on a patina of age, moss, or lichen.
You’ll be pleased with the resulting appearance of your efforts. Old concrete gets a Mediterranean-style upgrade – to classic Terra Cotta. How easy is that? Thank you, Marco – great tip!
POST-Script: Thanks to Jim Bishop of San Diego-based Bishop Garden Design, who originally saw this post on my Facebook page, I want to share his cool ideas for painting concrete:
If you want to give (terra cotta) an immediate aged look, get a second can of (paint) in a darker version of the first color.
Water this down too or add a glazing agent and paint lightly over the object especially in the recesses. Rub off the excess until you get the aged look you want. Oil based gel stains work well too for creating an aged look and give you a longer working time.
Get out that paint, people! Have some fun!




December 5th, 2010 at 9:04 am
Thanks for sharing this tip, Debra. I will definitely be trying this out!
December 6th, 2010 at 5:57 am
Cleaver Idea. Its great to see various ides of enriching your garden without spending too much money. Very fitting in these recessionary times.
December 6th, 2010 at 7:49 am
Love this idea. And it’s very timely as I’ve just rescued some discarded concrete ornaments from a client’s garden. Thanks, Debra!
December 6th, 2010 at 8:07 am
This is a fantastic post, Debra! I’m forwarding this on to my mother, who lives up north where it regularly dips into the teens, preventing her from using terra cotta (which cracks and crumbles). While we love the look of concrete, it’s nice to have the option of warmer hues in the garden. Thanks for sharing this excellent tip!
December 6th, 2010 at 8:37 am
What a wonderful post on Marcos, and his many talents. His gardens, trips to Venice, terra cotta painting. It makes you want to read more on him. You are so lucky he is in your neck of the woods.
December 6th, 2010 at 9:16 am
That is a fantastic idea. I will try it in the spring. Thanks for posting it.
December 6th, 2010 at 9:46 am
What a wonderful project and a great way to revitalize and refresh items we might already have around the garden, basement, garage…. Easy-peasy.
December 7th, 2010 at 8:39 pm
You may have just solved the design dilemma that had me stumped. How to pull in more of a color long off the retailer ready to install shelf.
December 24th, 2010 at 12:45 am
That is a fantastic idea. I will try it in the spring. Thanks for posting it.
May 2nd, 2011 at 10:08 am
I couldn’t help but comment on the Green Man in the garden! 😉
Yes, Bro’, you’re the original Green Man.